

In previous articles (Part 1, Part 2, Part 3) we created a simple Image Gallery desktop application. All this time we’ve been running the application in development mode using electron-build command. While this approach works well for development it will not work for regular users. In this article you will learn how to distribute an Electron application for Windows environments.
BUILD THE APPLICATION
As you already noticed our application always has DevTools console opened by default when you start the application.
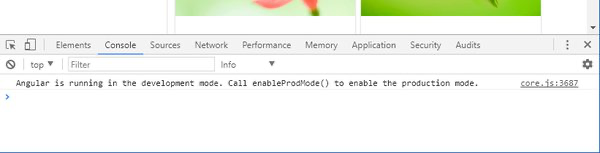
DevTools are useful during development process, but we do not want the end user to see this console, so it’s a good idea to disable it. To do that comment out DevTools opening line in the electron/main.ts file:
// mainWindow.webContents.openDevTools();Compile the application using the production configuration:
npm run electron-build-prodDOWNLOAD AND EXTRACT ELECTRON’S PREBUILT BINARIES
Download Electron’s prebuilt binaries. Check what version of the electron package you have in the package.json file and chose correct version from the list. We will use Electron’s binaries of version 1.8.x for Windows x64: e.g. electron-v1.8.7-win32-x64.zip.
Create bin folder in the root directory of the project. To prevent accidental commit of this folder, add this folder (/bin) to the root directory’s .gitignore file:
# compiled output
/dist
/dist-server
/tmp
/out-tsc
/bin
Extract the downloaded zip file of Electron’s pre-build binaries to the bin folder.
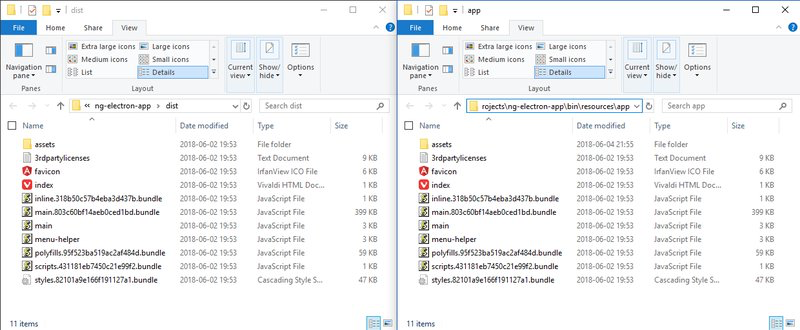
COPY COMPILED APPLICATION TO ELECTRON’S RESOURCES DIRECTORY
Create app folder in the bin/resources folder. Copy dist folder’s contents to the bin/resources/app folder.
CREATE PACKAGE.JSON FILE
Electron requires package.json file to be placed inside bin/resources/app folder. This file is different from the package.json file which is located in the root folder of the source code. Do not copy the package.json file from the root folder of the source code to the bin/resources/app. This will result into including all Angular dependencies (more than 400 MB) alongside with your app.
Let’s create a simple package.json file:
{
  "name": "ng-electron-app",
  "version": "0.0.0",
  "license": "MIT",
  "main": "main.js",
  "private": true,
  "dependencies": {}
}
It specifies application name, version, license type, entry point (main), npm publishing setting (private) and dependencies. In our case dependencies array is empty. But if you used any additional libraries in the Electron’s backend code you must add these dependencies to this array and run npm install command in the bin/resources/app folder.
Execute bin/electron.exe file, it should open your application.
REBRANDING
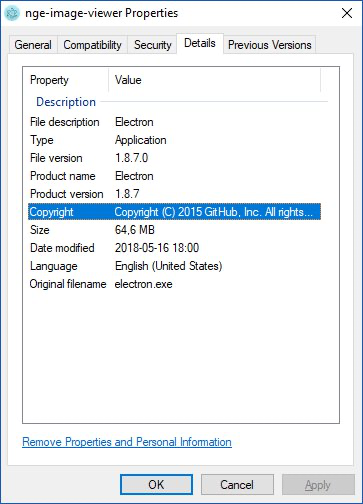
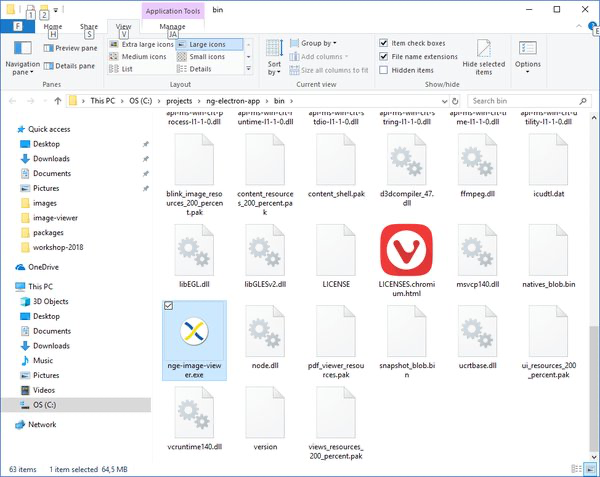
Electron’s prebuilt binaries provides electron.exe file which is main executable for the application. We do not want our application’s process to be called electron.exe. Navigate to bin folder and rename electron.exe to nge-image-viewer.exe.
Executable files usually contain icon and information about the product – name, company name, version, copyright, etc. By default, in the electron.exe file (now nge-image-viewer.exe, because we’ve just renamed it) this data is related to Electron product and GitHub organization, and it has Electron’s logo as the icon. You can see this data in file’s Properties dialog:
You can modify executable’s metadata and change its icon using Rcedit tool. Download the latest version of Rcedit executable.
With Rcedit’s –set-version-string argument you can modify product name, company name, copyright, original file name, file info description and other properties. The full list of supported properties is described in the MSDN documentation (in the string-name parameter’s documentation part). Using –set-product-version argument you can change the product’s version property. And –set-icon argument is responsible for changing the icon of the executable file.
Make sure the nge-image-viewer.exe process is not running and run the following commands to change executable’s metadata and icon:
rcedit-x64.exe "C:\projects\ng-electron-app\bin\nge-image-viewer.exe" --get-version-string "ProductName" "Electron"

rcedit-x64.exe "C:\projects\ng-electron-app\bin\nge-image-viewer.exe" --set-version-string "ProductName" "NGE Image Viewer"

rcedit-x64.exe "C:\projects\ng-electron-app\bin\nge-image-viewer.exe" --set-version-string "CompanyName" "Xplicity"

rcedit-x64.exe "C:\projects\ng-electron-app\bin\nge-image-viewer.exe" --set-product-version "1.0"

rcedit-x64.exe "C:\projects\ng-electron-app\bin\nge-image-viewer.exe" --set-version-string "LegalCopyright" "Copyright (c) 2018 Xplicity. All rights reserved."

rcedit-x64.exe "C:\projects\ng-electron-app\bin\nge-image-viewer.exe" --set-version-string "OriginalFilename" "nge-image-viewer.exe"

rcedit-x64.exe "C:\projects\ng-electron-app\bin\nge-image-viewer.exe" --set-version-string "FileDescription" "NGE Image Viewer"

rcedit-x64.exe "C:\projects\ng-electron-app\bin\nge-image-viewer.exe" --set-icon "C:\Users\Andrius\Downloads\x_icon.ico"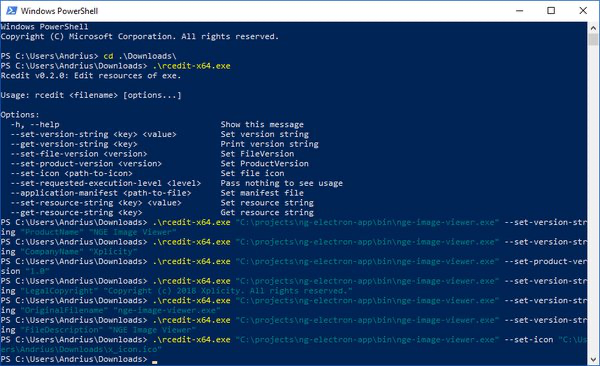
Don’t forget to modify paths to match your existing paths. If you use x86 version of the Rcedit tool, use rcedit-x86.exe instead of rcedit-x64.exe in the commands.
Navigate to file, open file properties and check the results.

CONCLUSION
After all steps that we’ve made, bin folder contains files that can be distributed. The nge-image-viewer.exe is the application’s executable, which has the icon and product information set. From this point, you can build an installer or just create a zip file from bin folder’s contents. In order to update the application’s distributable files it is enough to clean up the bin/resources/app folder (delete everything except package.json), run npm install command if needed, and copy the dist folder’s contents to the bin/resources/app folder. You can automate these steps by adding additional custom commands to your application source code root folder’s package.json file.