

In the previous article we created a simple Image Gallery desktop application. You’ve learnt how to add components and services to an Electron-Angular desktop application and how to access Node.js modules from the application. In this article you will learn how to configure application menu and system tray, and how to call system dialogs (e.g. save dialog).
Let’s extend the Image Gallery that we created in the last article.
We are going to configure application menu. We will leave only File, View and Help menus. The File menu will contain single Exit item, and View menu will contain Reload, Force Reload, Toggle Developer Tools, Actual Size, Zoom In and Zoom Out items. Help will contain About item, which will open About dialog.
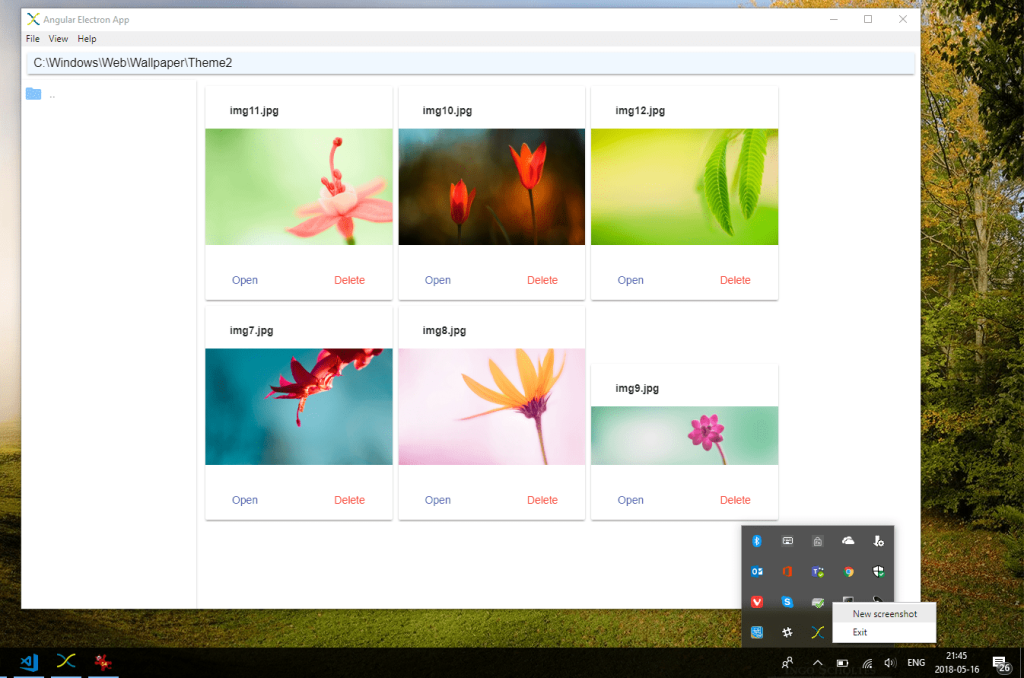
We will add system tray icon that will have New Screenshot and Exit menu items. On New Screenshot click the application will take a screenshot of the screen, then it will display save dialog where a user can specify where to save the screenshot.
Also, we will extend the Gallery component by adding Open and Delete buttons to thumbnails of the images. The Open button will open the image in the default image viewing application. The Delete button will show a confirmation dialog and in case of approval will delete a selected image from the disk.

APPLICATION MENU
Build menu
Create menu-helper.ts file in the electron folder. Declare MenuHelper class in the file. Create a class constructor that has browserWindow parameter of BrowserWindow type.
import { BrowserWindow } from 'electron';

export class MenuHelper {
  constructor(private browserWindow: BrowserWindow) {
  }
}
An application menu can be build using menu template. The menu template syntax is easy – it’s just an array of menus and their submenus. Each menu item can have either a click event or a role assigned. Roles are predefined behaviors of menu items, e.g. if we assign the role “quit” to a menu item, it will quit the application on that menu item click. You can find the full list of roles here. Also, it is possible to specify a type of menu item. It can be normal, separator, submenu, checkbox or radio.
Let’s add the following menu template to the MenuHelper class:
private mainMenuTemplate: MenuItemConstructorOptions[] = [
  {
    label: 'File',
    submenu: [
      {
        label: 'Exit',
        role: 'close'
      }
    ]
  },
  {
    label: 'View',
    submenu: [
      {role: 'reload'},
      {role: 'forcereload'},
      {role: 'toggledevtools'},
      {type: 'separator'},
      {role: 'resetzoom'},
      {role: 'zoomin'},
      {role: 'zoomout'},
      {type: 'separator'},
      {role: 'togglefullscreen'}
    ]
  },
  {
    label: 'Help',
    submenu: [
      {
        label: 'About',
        click: () => {
          this.browserWindow.webContents.send('about');
        }
      }
    ]
  }
];
Here we use roles for menu items of File and View menus. The Help -> About menu item has click event attached. On its click it will send an asynchronous message (“about”) to renderer process (our Angular app). From the Angular app we will listen for this message and will display the About dialog, when the message is received.
Add mainMenu property which will build menu object from the template and will return it:
get mainMenu(): Menu {
  return Menu.buildFromTemplate(this.mainMenuTemplate);
}
The full contents of the electron/menu-helper.ts:
import { BrowserWindow, MenuItemConstructorOptions, Menu } from 'electron';

export class MenuHelper {
  constructor(private browserWindow: BrowserWindow) {
  }

  private mainMenuTemplate: MenuItemConstructorOptions[] = [
    {
      label: 'File',
      submenu: [
        {
          label: 'Exit',
          role: 'close'
        }
      ]
    },
    {
      label: 'View',
      submenu: [
        {role: 'reload'},
        {role: 'forcereload'},
        {role: 'toggledevtools'},
        {type: 'separator'},
        {role: 'resetzoom'},
        {role: 'zoomin'},
        {role: 'zoomout'},
        {type: 'separator'},
        {role: 'togglefullscreen'}
      ]
    },
    {
      label: 'Help',
      submenu: [
        {
          label: 'About',
          click: () => {
            this.browserWindow.webContents.send('about');
          }
        }
      ]
    }
  ];

  get mainMenu(): Menu {
    return Menu.buildFromTemplate(this.mainMenuTemplate);
  }

}
To set an application menu we need to call Menu.setApplicationMenu(menu: Menu) method after the ready event of app module. In the electron/main.tsmodify ready event listener. Replace the following line:
app.on('ready', createWindow);with:
app.on('ready', () => {
  createWindow();

  const menuHelper = new MenuHelper(mainWindow);

  Menu.setApplicationMenu(menuHelper.mainMenu);

});
The full contents of the electron/main.ts file:
import { app, BrowserWindow, Menu } from 'electron';
import * as path from 'path';
import * as url from 'url';
import { MenuHelper } from './menu-helper';

let mainWindow: Electron.BrowserWindow;

function createWindow() {
  // Create the browser window.
  mainWindow = new BrowserWindow({
    height: 600,
    width: 800,
  });

  // and load the index.html of the app.
  mainWindow.loadURL(url.format({
      pathname: path.join(__dirname, 'index.html'),
      protocol: 'file:',
      slashes: true,
  }));

  // Open the DevTools.
  mainWindow.webContents.openDevTools();

  // Emitted when the window is closed.
  mainWindow.on('closed', () => {
    // Dereference the window object, usually you would store windows
    // in an array if your app supports multi windows, this is the time
    // when you should delete the corresponding element.
    mainWindow = null;
  });
}

// This method will be called when Electron has finished
// initialization and is ready to create browser windows.
// Some APIs can only be used after this event occurs.
app.on('ready', () => {
  createWindow();

  const menuHelper = new MenuHelper(mainWindow);

  Menu.setApplicationMenu(menuHelper.mainMenu);

});

// Quit when all windows are closed.
app.on('window-all-closed', () => {
  // On OS X it is common for applications and their menu bar
  // to stay active until the user quits explicitly with Cmd + Q
  if (process.platform !== 'darwin') {
    app.quit();
  }
});

app.on('activate', () => {
  // On OS X it's common to re-create a window in the app when the
  // dock icon is clicked and there are no other windows open.
  if (mainWindow === null) {
    createWindow();
  }
});

// In this file you can include the rest of your app's specific main process
// code. You can also put them in separate files and require them here.
Adjust build commands
We’ve just added the new electron/menu-helper.ts file to the project, and therefore we need to add it to compilation process. In the package.json add a new electron-tsc command and modify existing electron-build and electron-build-prod commands:
"electron-tsc": "tsc electron/main.ts --outDir dist -t es5 && electron ./dist/main.js",
"electron-build": "ng build && npm run electron-tsc",
"electron-build-prod": "ng build --prod && npm run electron-tsc"
Here we moved electron files compilation to the separate command electron-tsc. The command is called from electron-build and electron-build-prodcommands.
Check if it works:
npm run electron-build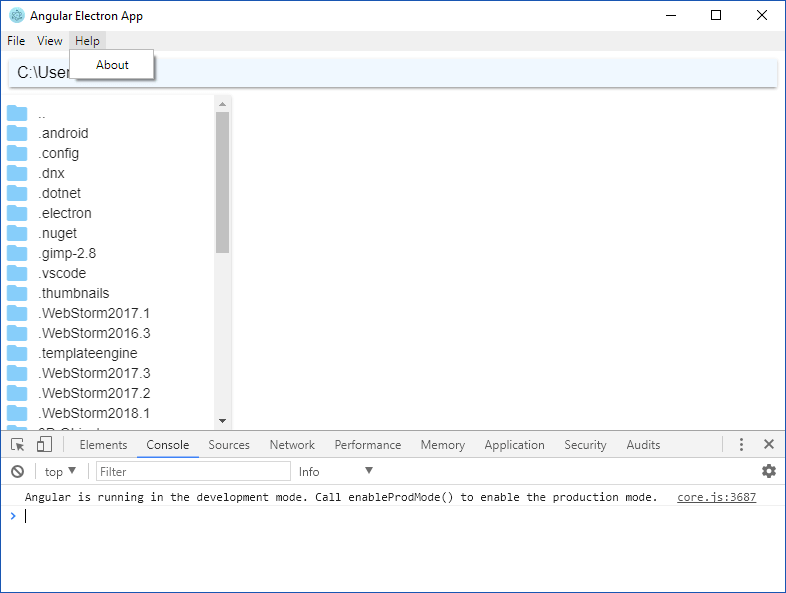
You should see the updated application menu. All menu items should work except Help->About.
Create About dialog
We need an about dialog to show it on Help->About menu item click. So, let’s create one. Run the following command to create component for the About dialog:
ng g component components/aboutWe will use MatDialog from the Angular Material library to display the component as a dialog (popup). Add entryComponents array to the src/app/app.module.ts and add the just created AboutComponent to this array. Also, add the MatDialogModule to the imports array in the same file:
entryComponents: [
  AboutComponent
],
imports: [
  BrowserModule,
  BrowserAnimationsModule,
  MatListModule,
  MatIconModule,
  MatCardModule,
  MatDialogModule
],
Check the MatDialogModule’s import statement and add if needed:
import {MatListModule, MatIconModule, MatCardModule, MatDialogModule} from '@angular/material';Inject MatDialogRef to the constructor of the AboutComponent class and declare public close() method that will close the dialog. The full contents of src/app/components/about/about.component.ts:
import { Component, OnInit } from '@angular/core';
import { MatDialogRef } from '@angular/material';

@Component({
  selector: 'app-about',
  templateUrl: './about.component.html',
  styleUrls: ['./about.component.scss']
})
export class AboutComponent implements OnInit {

  constructor(private dialog: MatDialogRef) { }

  ngOnInit() {
  }

  close() {
    this.dialog.close();
  }

}
In the template we just show title and image, both wrapped in div with click event attached (src/app/components/about/about.component.html):
<div (click)="close()">
  <h2>Electron Angular Image Viewerh2>
  <img src="assets/img/xpl_640.png" height="153" width="550"/>
div>
Make “electron” module accessible from the Angular app
We need to use electron module for receiving messages that we send from the Help->About click event. To make the electron module accessible from our Angular app add the following line to src/js/modules.js:
window.ELECTRON = require('electron');Then, create a wrapper property for the window.ELECTRON variable in the RequiredModulesService (src/app/services/required-modules.service.ts):
get electron(): any {
  return this.browserWindow.ELECTRON;
}
Create Electron Menu service
Electron Menu service will be responsible for receiving messages from Electron backend and invoking corresponding actions. Create the service with the following command:
ng g service services/electron-menuAdd the ElectronMenuService to the providers array of the src/app/app.module.ts file:
providers: [
  RequiredModulesService,
  FileService,
  ElectronMenuService
],
Check the import statement and add it if needed:
import { ElectronMenuService } from './services/electron-menu.service';The full contents of the service (src/app/services/electron-menu.service.ts):
import { Injectable, NgZone } from '@angular/core';
import { RequiredModulesService } from './required-modules.service';
import { MatDialog } from '@angular/material';
import { AboutComponent } from '../components/about/about.component';

@Injectable()
export class ElectronMenuService {

  constructor(private requiredModulesService: RequiredModulesService,
    private dialog: MatDialog, private ngZone: NgZone) {
      requiredModulesService.electron.ipcRenderer.on('about', () => {
        this.showAboutDialog();
      });
  }

  showAboutDialog() {
    this.ngZone.run(() => {
      this.dialog.closeAll();
      this.dialog.open(AboutComponent);
    });
  }

}
Here, we injected RequiredModulesService, MatDIalog and NgZone to the class. We added showAboutDialog method which opens the About dialog. Pay attention that the call wrapped into the ngZone.run() method. Running functions via Angular zone’s run allows to reenter Angular zone from a task that was executed outside of the Angular zone (in our case Electron backend is outside of the Angular zone). In the constructor we use Electron’s ipcRenderer module to receive messages from the Electron backend. Particularly, the ipcRendrer.on method listens for the “about” message from the Electron backend and invokes function that opens About dialog when the message is received.
Inject the Electron Menu service to the App component (src/app/app.component.ts):
constructor(private changeDetector: ChangeDetectorRef, electronMenuService: ElectronMenuService) {}The injection will make sure that the constructor of the ElectronMenuService will be called and the service will start listening for messages from Electron backend.
Recompile the app, select Help->About menu and see the results:
npm run electron-build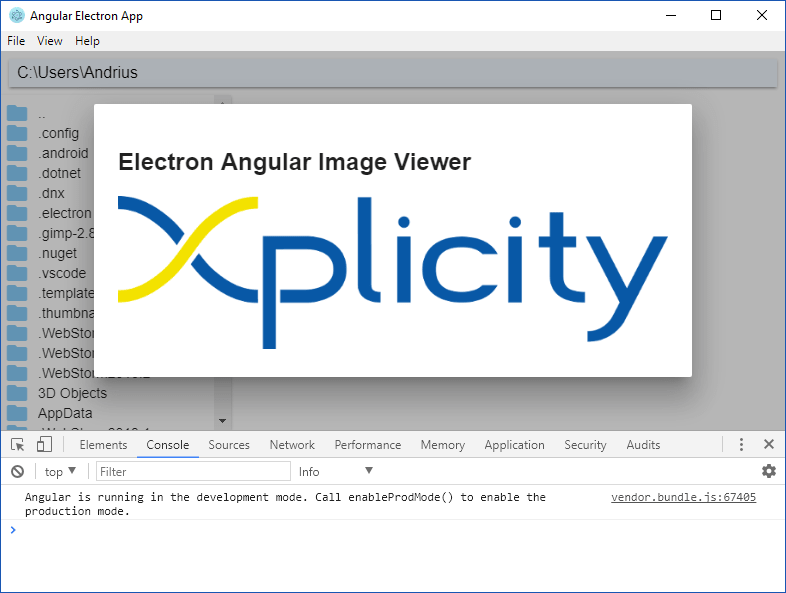
SYSTEM TRAY
Build system tray menu
Constructing of system tray’s menu is similar to what we did for building of the application menu. Declare menu template in the MenuHelper class (electron/menu-helper.ts):
private trayMenuTemplate: MenuItemConstructorOptions[] = [
  {
    label: 'New screenshot',
    click: () => {
      this. browserWindow.webContents.send('screenshot');
    }
  },
  {
    label: 'Exit',
    click: () => { app.quit(); }
  }
];
The system tray menu contains two items “New screenshot” and “Exit”. “New screenshot” sends the “screenshot” message to the frontend, and “Exit” just quits the app.
Make sure you added the import statement for the app:
import { BrowserWindow, MenuItemConstructorOptions, Menu, app } from 'electron';Add trayMenu property to the same class:
get trayMenu() {
  return Menu.buildFromTemplate(this.trayMenuTemplate);
}
This builds the system tray menu object from the template and returns it.
In the electron/main.ts file declare appIcon and iconPath variables:
let appIcon: Tray;
const iconPath = path.join(__dirname, 'assets/img/x-icon.png');
in the “ready” event listener, instantiate appIcon variable, set icon path, tooltip, and context menu:
appIcon = new Tray(iconPath);
appIcon.setToolTip('Image Viewer');
appIcon.setContextMenu(menuHelper.trayMenu);
Also make the application window a bit bigger and set the application icon:
mainWindow = new BrowserWindow({
  height: 800,
  width: 1200,
  icon: iconPath
});
The full contents of the electron/main.ts file:
import { app, BrowserWindow, Menu, Tray } from 'electron';
import * as path from 'path';
import * as url from 'url';
import { MenuHelper } from './menu-helper';

let mainWindow: Electron.BrowserWindow;
let appIcon: Tray;
const iconPath = path.join(__dirname, 'assets/img/x-icon.png');

function createWindow() {
  // Create the browser window.
  mainWindow = new BrowserWindow({
    height: 800,
    width: 1200,
    icon: iconPath
  });

  // and load the index.html of the app.
  mainWindow.loadURL(url.format({
      pathname: path.join(__dirname, 'index.html'),
      protocol: 'file:',
      slashes: true,
  }));

  // Open the DevTools.
  mainWindow.webContents.openDevTools();

  // Emitted when the window is closed.
  mainWindow.on('closed', () => {
    // Dereference the window object, usually you would store windows
    // in an array if your app supports multi windows, this is the time
    // when you should delete the corresponding element.
    mainWindow = null;
  });
}

// This method will be called when Electron has finished
// initialization and is ready to create browser windows.
// Some APIs can only be used after this event occurs.
app.on('ready', () => {
  createWindow();

  const menuHelper = new MenuHelper(mainWindow);

  Menu.setApplicationMenu(menuHelper.mainMenu);

  appIcon = new Tray(iconPath);
  appIcon.setToolTip('Image Viewer');
  appIcon.setContextMenu(menuHelper.trayMenu);


});

// Quit when all windows are closed.
app.on('window-all-closed', () => {
  // On OS X it is common for applications and their menu bar
  // to stay active until the user quits explicitly with Cmd + Q
  if (process.platform !== 'darwin') {
    app.quit();
  }
});

app.on('activate', () => {
  // On OS X it's common to re-create a window in the app when the
  // dock icon is clicked and there are no other windows open.
  if (mainWindow === null) {
    createWindow();
  }
});

// In this file you can include the rest of your app's specific main process
// code. You can also put them in separate files and require them here.
Check the results:
npm run electron-buildScreenshot service
Create Screenshot service that will be responsible for taking and saving screenshots.
ng g service services/screenshotInject RequiredModulesService to the service class (app/services/screenshot.service.ts):
constructor(private requiredModulesService: RequiredModulesService) { }Declare helper variables:
private screen = this.requiredModulesService.electron.screen;
private desktopCapturer = this.requiredModulesService.electron.desktopCapturer;
private remote = this.requiredModulesService.electron.remote;
private shell = this.requiredModulesService.electron.shell;
Add determineScreenshotSize method which calculates screenshot size based on primary display’s resolution and DPI:
private determineScreenshotSize() {
  const screenSize = this.screen.getPrimaryDisplay().workAreaSize;
  const maxDimension = Math.max(screenSize.width, screenSize.height);
  return {
    width: maxDimension * window.devicePixelRatio,
    height: maxDimension * window.devicePixelRatio
  };
}
Add takeScreenshot method:
takeScreenshot() {
const screenshotSize = this.determineScreenshotSize();
const options = { types: ['screen'], thumbnailSize: screenshotSize };
this.desktopCapturer.getSources(options, (error, sources) => {
if (error) {
console.error(error);
this.remote.dialog.showErrorBox('Error', error);
}
sources.filter(source => source.name === 'Entire screen' || source.name === 'Screen 1').forEach(source => {
this.remote.dialog.showSaveDialog({filters: [{name: 'PNG Files', extensions: ['png']}]}, (fileName) => {
if (fileName == null) { return; }
this.requiredModulesService.fs.writeFile(fileName, source.thumbnail.toPng(), writeError => {
if (writeError) {
console.error(writeError);
this.remote.dialog.showErrorBox('Error', writeError);
} else {
this.shell.openExternal(`file://${fileName}`);
}
});
});
});
});
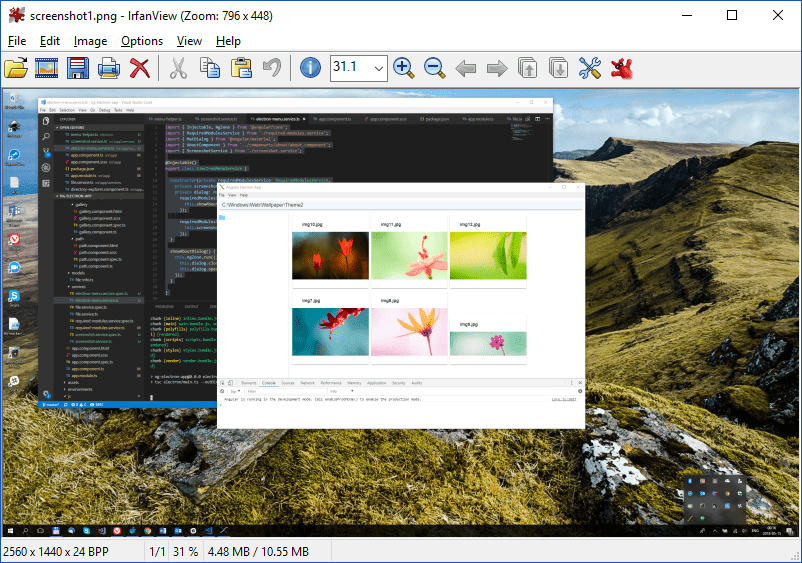
}The method takes a screenshot, displays system’s save dialog, saves the screenshot as a PNG file, and opens the saved picture in the default PNG image viewing application. In case of an error, it displays a modal dialog that shows the error message.
The full contents of app/services/screenshot.service.ts:
import { Injectable } from '@angular/core';
import { RequiredModulesService } from './required-modules.service';

@Injectable()
export class ScreenshotService {

  private screen = this.requiredModulesService.electron.screen;
  private desktopCapturer = this.requiredModulesService.electron.desktopCapturer;
  private remote = this.requiredModulesService.electron.remote;
  private shell = this.requiredModulesService.electron.shell;


  constructor(private requiredModulesService: RequiredModulesService) { }

  private determineScreenshotSize() {
    const screenSize = this.screen.getPrimaryDisplay().workAreaSize;
    const maxDimension = Math.max(screenSize.width, screenSize.height);
    return {
      width: maxDimension * window.devicePixelRatio,
      height: maxDimension * window.devicePixelRatio
    };
  }

  takeScreenshot() {
    const screenshotSize = this.determineScreenshotSize();
    const options = { types: ['screen'], thumbnailSize: screenshotSize };
    this.desktopCapturer.getSources(options, (error, sources) => {
      if (error) {
        console.error(error);
        this.remote.dialog.showErrorBox('Error', error);
      }

      sources.filter(source => source.name === 'Entire screen' || source.name === 'Screen 1').forEach(source => {
        this.remote.dialog.showSaveDialog({filters: [{name: 'PNG Files', extensions: ['png']}]}, (fileName) => {
          if (fileName == null) { return; }
          this.requiredModulesService.fs.writeFile(fileName, source.thumbnail.toPng(), writeError => {
            if (writeError) {
              console.error(writeError);
              this.remote.dialog.showErrorBox('Error', writeError);
            } else {
              this.shell.openExternal(`file://${fileName}`);
            }
          });
        });
      });
    });
  }

}
Add the ScreenshotService to the providers array of the src/app/app.module.ts file:
providers: [
  RequiredModulesService,
  FileService,
  ElectronMenuService,
  ScreenshotService
],
Check the import statement, and add it if needed:
import { ScreenshotService } from './services/screenshot.service';Inject the ScreenchotService to the ElectronMenuService‘s class and add listener for the „screenshot“ event to the constructor (src/app/services/electron-menu-service.ts):
requiredModulesService.electron.ipcRenderer.on('screenshot', () => {
  this.screenshotService.takeScreenshot();
});
The full contents of src/app/services/electron-menu.service.ts:
import { Injectable, NgZone } from '@angular/core';
import { RequiredModulesService } from './required-modules.service';
import { MatDialog } from '@angular/material';
import { AboutComponent } from '../components/about/about.component';
import { ScreenshotService } from './screenshot.service';

@Injectable()
export class ElectronMenuService {

  constructor(private requiredModulesService: RequiredModulesService,
    private screenshotService: ScreenshotService,
    private dialog: MatDialog, private ngZone: NgZone) {
      requiredModulesService.electron.ipcRenderer.on('about', () => {
        this.showAboutDialog();
      });

      requiredModulesService.electron.ipcRenderer.on('screenshot', () => {
        this.screenshotService.takeScreenshot();
      });
  }

  showAboutDialog() {
    this.ngZone.run(() => {
      this.dialog.closeAll();
      this.dialog.open(AboutComponent);
    });
  }

}
Recompile the app and try to take a screenshot using system tray menu:
npm run electron-build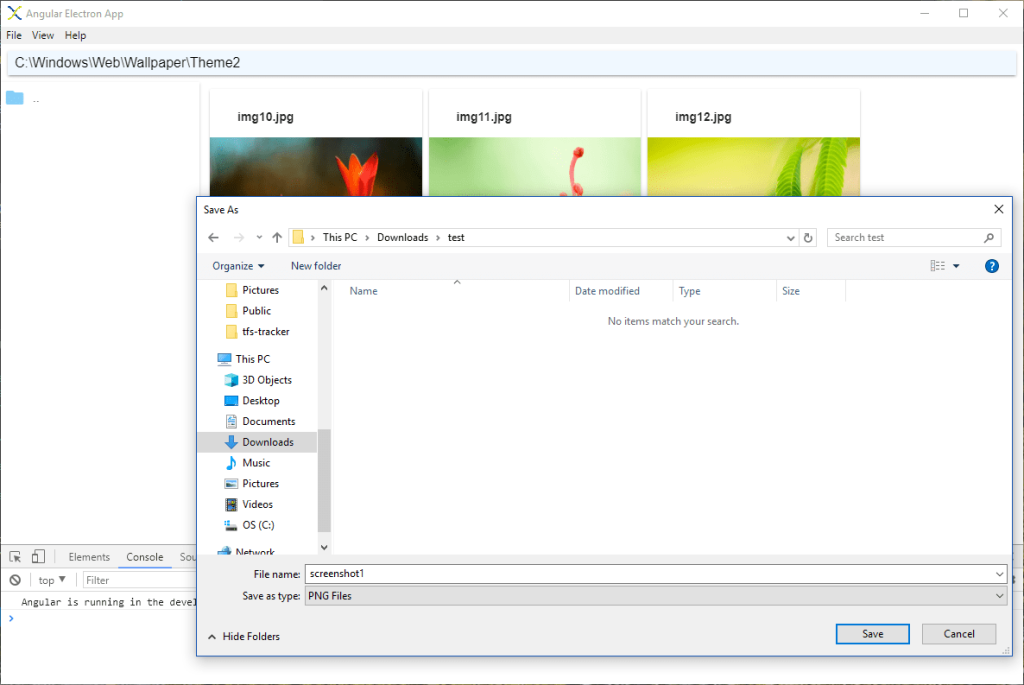
After you click “Save” in the save dialog, the saved screenshot image file will be opened in the application associated with PNG extension.
OPEN AND DELETE IMAGE FUNCTIONALITY
Let’s extend our Gallery by adding Open and Delete buttons to thumbnails. We will use MatButton component from the Angular Material library, therefore we need to add MatButtonModule to the imports array in the src/app/app.module.ts file:
imports: [
  BrowserModule,
  BrowserAnimationsModule,
  MatListModule,
  MatIconModule,
  MatCardModule,
  MatDialogModule,
  MatButtonModule
],
Check the import statement and add it if needed:
import {MatListModule, MatIconModule, MatCardModule, MatDialogModule, MatButtonModule} from '@angular/material';Add two new methods to the File service (src/app/services/file.services.ts) – one for opening a file, and other for deleting a file:
openFile(path: string) {
  this.requiredModulesService.electron.shell.openItem(path);
}

deleteFile(path: string) {
  this.requiredModulesService.fs.unlink(path, error => {
    console.error(error);
  });
}
Inject RequiredModulesService to the Gallery component‘s class (src/app/components/gallery/gallery.component.ts):
constructor(private fileService: FileService,
  private requiredModulesService: RequiredModulesService,
  private changeDetector: ChangeDetectorRef) { }
Add openFile method to the same class:
openFile(fileInfo: FileInfo) {
  this.fileService.openFile(fileInfo.fullPath);
}
The method is very simple – it just calls openFile method from the FileService.
Also add deleteFile method:
deleteFile(fileInfo: FileInfo) {
  const dialog = this.requiredModulesService.electron.remote.dialog;
  const currentWindow = this.requiredModulesService.electron.remote.getCurrentWindow();
  dialog.showMessageBox(currentWindow, {
    type: 'question',
    buttons: ['Yes', 'No'],
    title: 'Confirm',
    message: `Are you sure you want to delete ${fileInfo.name}?`
  }, (choice) => {
    if (choice === 0) {
      this.fileService.deleteFile(fileInfo.fullPath);
      const index = this.imageFiles.indexOf(fileInfo);
      if (index !== -1) {
        this.imageFiles.splice(index, 1);
        this.changeDetector.detectChanges();
      }
    }
  }
  );
}
The method displays confirmation dialog, and, in case of approval, calls deleteFile method from the File service, removes file from the imageFiles array, and tells Angular to detect changes. The remote module allows us to use Electron’s main process modules (such as dialog) from the frontend (renderer process).
In the Gallery component’s template add “Open” and “Delete” buttons with the appropriate events (src/app/components/gallery/gallery.component.html):
<mat-card-actions>
  <button mat-button color="primary" (click)="openFile(file)">Openbutton>
  <button mat-button color="warn" class="float-right" (click)="deleteFile(file)">Deletebutton>
mat-card-actions>
The full contents of the src/app/components/gallery/gallery.component.html file:
<div class="container">
  <mat-card *ngFor="let file of imageFiles" class="image-preview">
    <mat-card-header>
      <mat-card-title>{{file.name}}mat-card-title>
    mat-card-header>
    <img mat-card-image src="{{file.url}}" alt="{{file.name}}">
    <mat-card-actions>
      <button mat-button color="primary" (click)="openFile(file)">Openbutton>
      <button mat-button color="warn" class="float-right" (click)="deleteFile(file)">Deletebutton>
    mat-card-actions>
  mat-card>
div>
Add style for the float-right class to the global styles (src/styles.scss):
.float-right {
  float: right;
}
Recompile the app and check if it works:
npm run electron-build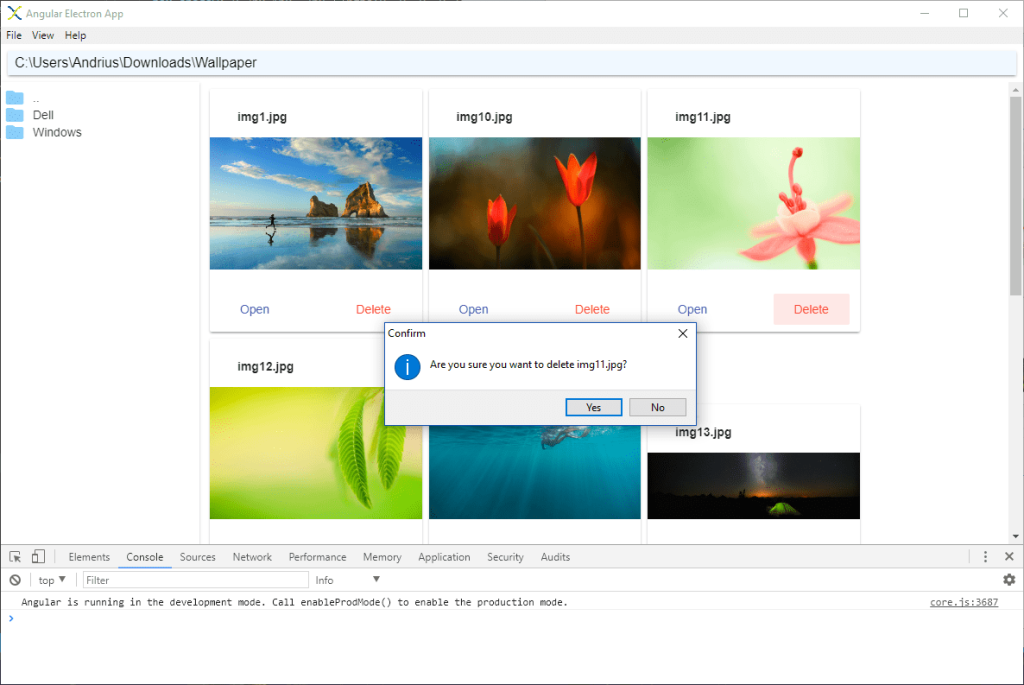
CONCLUSION
We’ve extended the Image Gallery desktop application. Now it has application menu and system tray icon with menu. Also, the application can take screenshots, open and delete image files.
You’ve learnt how to configure menu, system tray, and handle menu events from the Angular side of the application. Besides that, you’ve learnt how to take a screenshot and use system dialogs and call them from the frontend.
In the next article you will learn how to distribute an Electron-Angular application.
The source code of this article’s project is available here.